
It was a long holiday weekend here in Canada and I used some of the extra time to finish installing DCC in my first three NS&T freight motors. This was relatively straight-forward. Having done the first one earlier in the week, it was a simple matter of replicating what I’d already done, two more times.
It also helps that for these models, I built a simple sub-frame to which I could mount the trucks and the DCC package as a single unit. The body and frame simply drop on top and are secured in place with four screws. Here’s a look at what’s under the hood of Number 8:
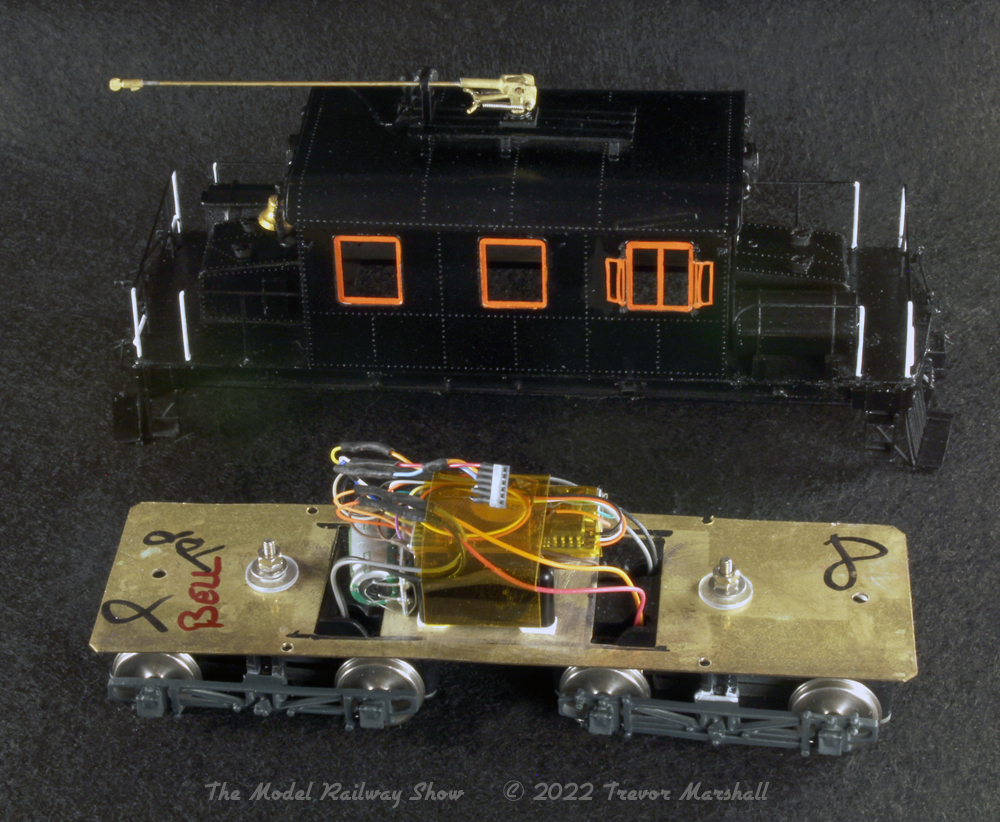
In the above photo, I’ve installed a 0.78″ round high-bass speaker into a purpose-built enclosure – both from the DCC specialists at Tony’s Train Exchange. The enclosure is mounted over a hole drilled in the sub-frame, with the speaker pointing down to drive sound through the floor.
I used four pads of double-sided foam table to mount the enclosure: The thickness of the tape provides a bit of an air gap so the speaker cone isn’t going to hit the floor, while the foam dampens any vibration from the speaker so it doesn’t cause any rattles in the all-brass body.
The speaker enclosure becomes a handy, non-conductive mounting point for the DCC package. My decoder – an ESU LokSound V5 – rides on the top of the enclosure, secured in place with Kapton tape (which is the best tape for use around electronics, as it sheds heat quickly). The ESU PowerPack that enhances the decoder’s electrical reliability is mounted to one side of the speaker enclosure with a small tab of double-sided non-foam tape. I wired the speaker and PowerPack to the decoder before mounting, then hooked up rest of the wiring. The two power trucks – NWSL Stanton Drives – are wired in parallel: The trucks draw so little current that the V5 has no issues with this.
Finally, I wired in the female half of a connector that will supply power to the two headlights in the body. (I always use the female half on the power-generating side of any connection, so that when the unplugged connector is flopping about it can’t accidentally hit the frame, the track, or another conductor, which could cause a short or harm the decoder.) While I only need three wires for this (front and back light, plus common return), I used a TCS six-pin connector because they’re small and that’s what I had on hand. I’ll wire up the male half of the connector and install the lights after I’ve finished lettering and weathering the body.
For the sound files themselves, I’ve modified the Pennsylvania RR GG1 sound package from ESU to disable some of heavy electric sounds while making the flange squeal feature active (at a low volume!) whenever the freight motor is moving. This is a good stand-in until a better sound file becomes available.
This is about as easy as DCC gets.
I’m currently waiting for decals to arrive so can tackle one of the most challenging aspects of finishing these models: the frame stripes. I’ve put work on the Three Sisters on hiatus until those arrive. But I’ve already started working on my next freight motor build, and I’m planning a chunk of benchwork on which to built a test-bed for overhead wiring. Watch this space…
